

It’s
quite special

And it is absolutely FANTASTIQUE

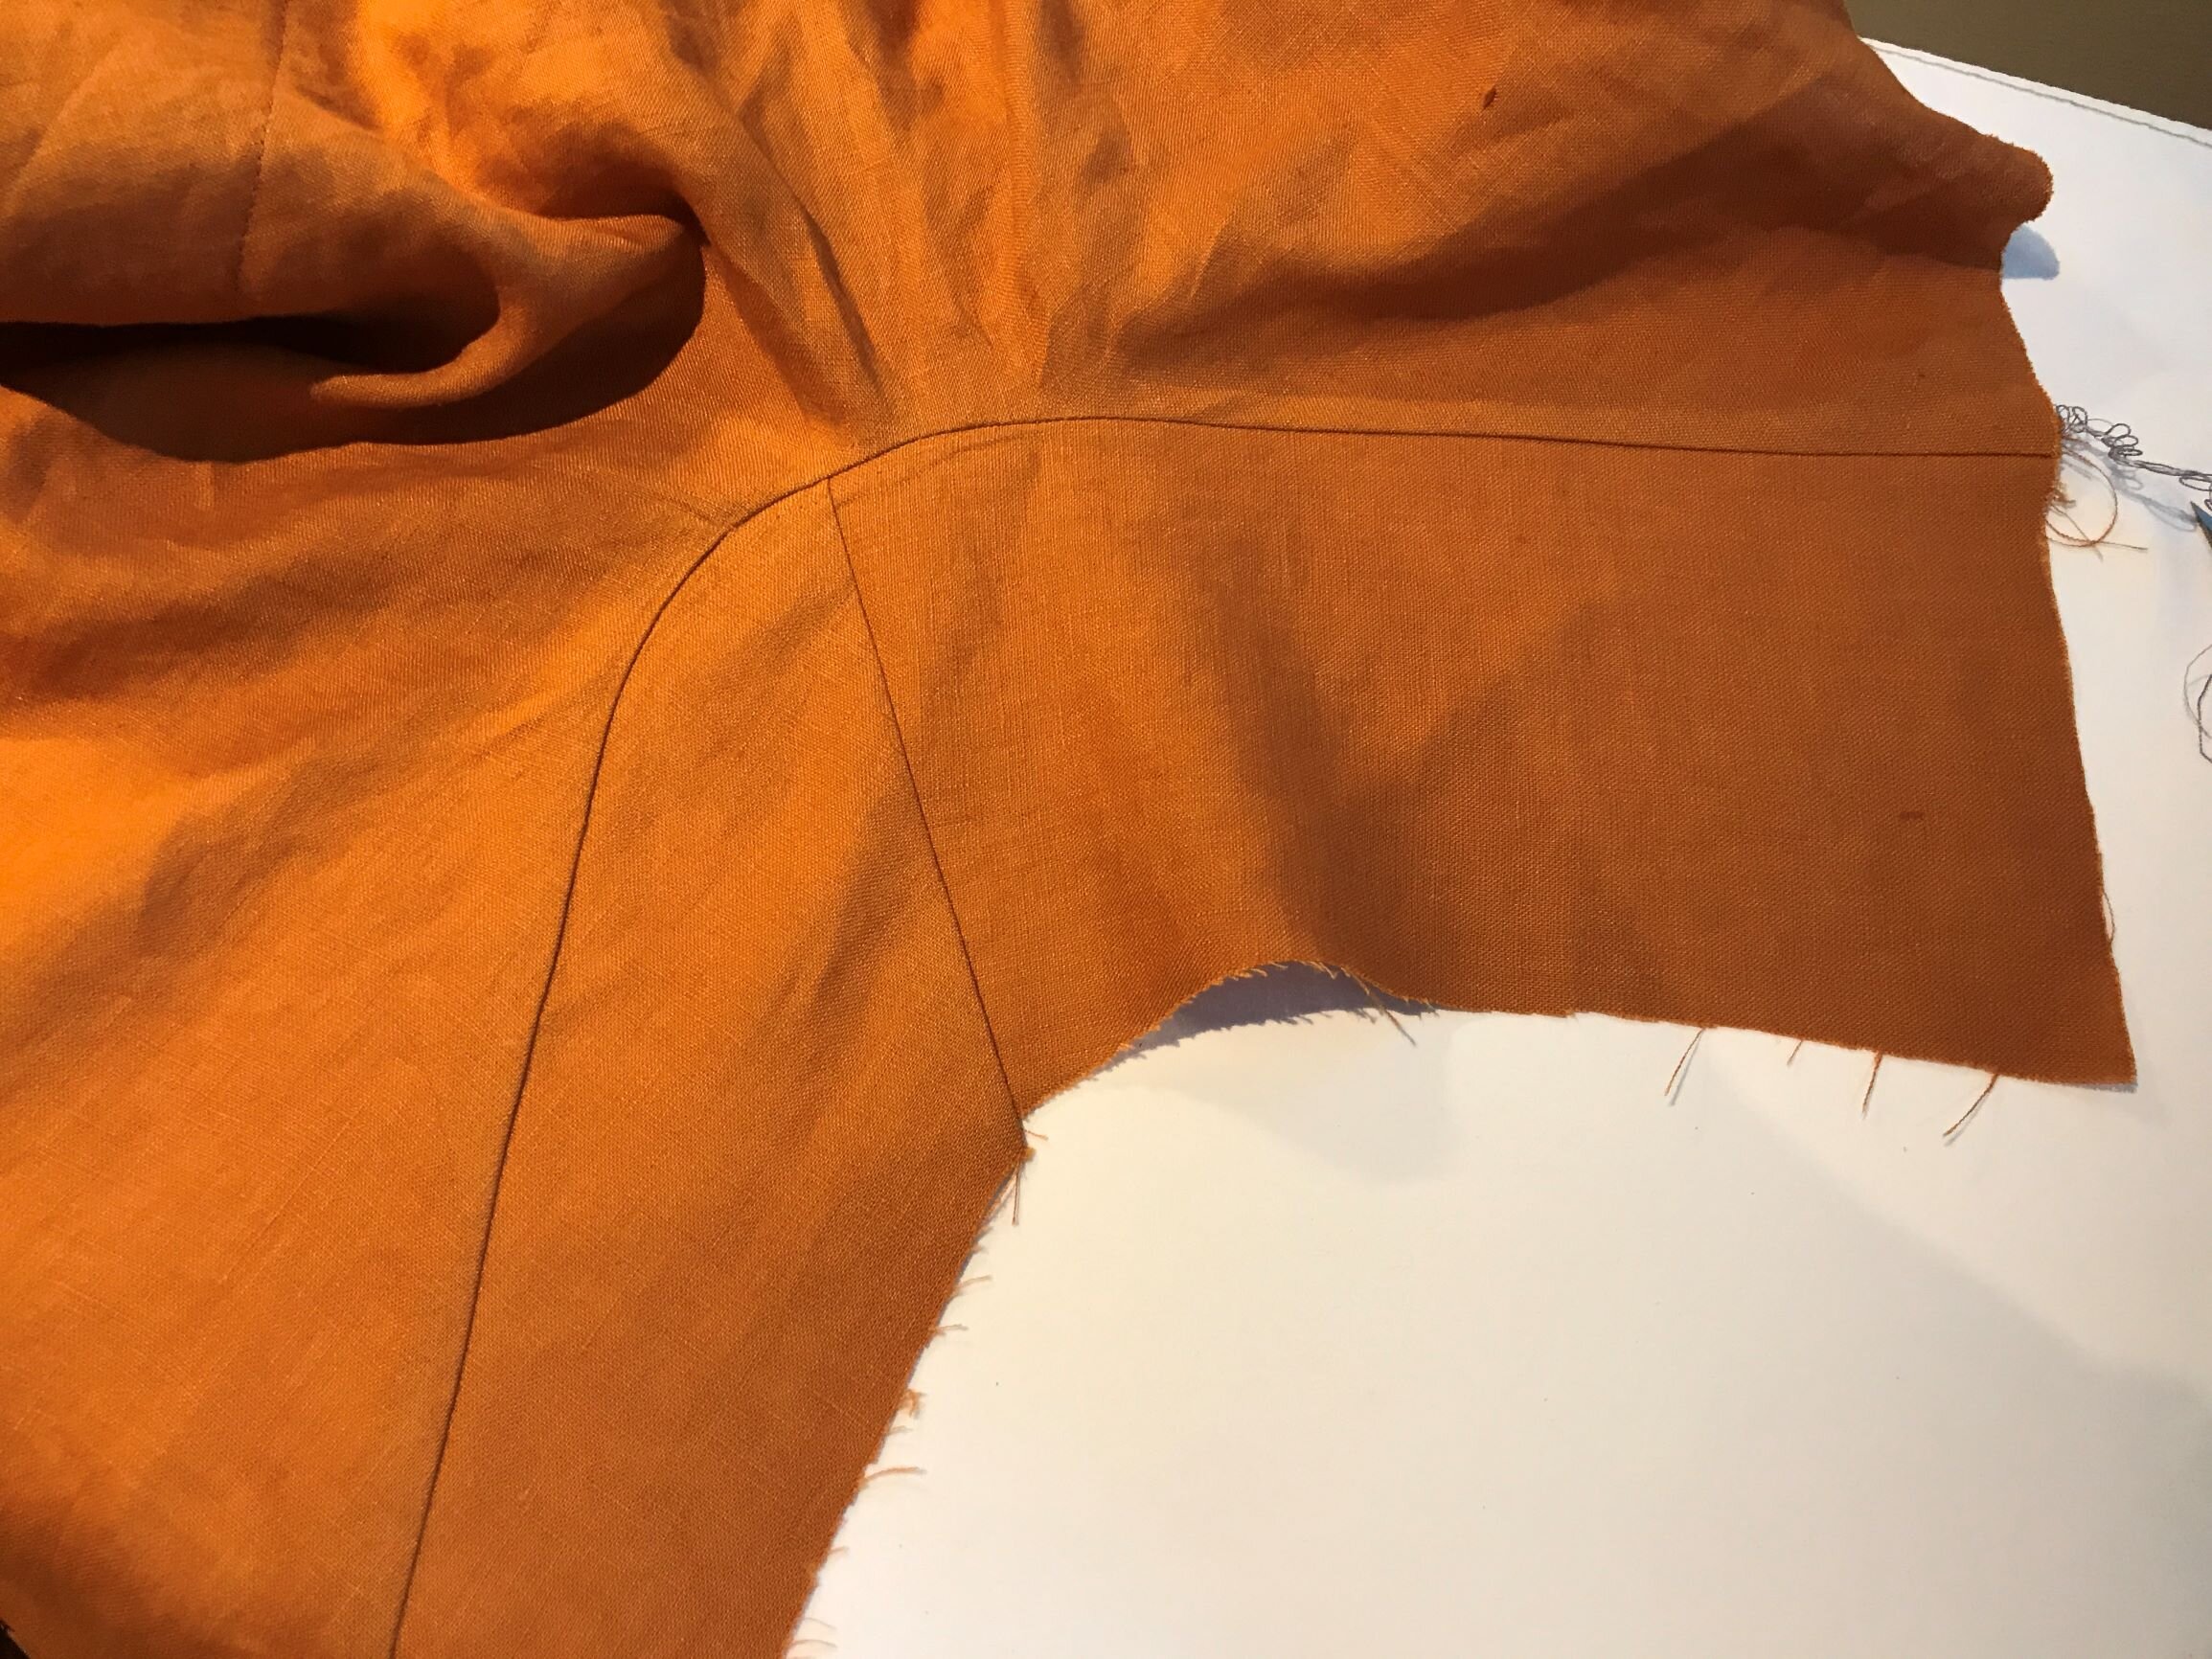
gusset

Double
gusset
omg
I saw Anna wearing this dress at Melbourne Frocktails & although I inexplicably didn’t get to talk with her that night, I knew it was a PF design & commenced begging Nita-Jane for a copy but she’d only designed it in size 10 at that stage of development so I had to wait but. Then I got it! I tested the top version & well I love it, it feels floaty but purposeful, loose and structured as you will see. Dynasty is a valid reference but this is an elegant design & there’s such intelligence in it…did you see the gussets?? Who can do that! Nita-Jane McMahon, the talent is real.

Having made two, I have some findings to report & the first thing is, ACCURACY. PF patterns are technically accomplished & everything lines up perfectly so just stay with the 1cm seam allowance, be clear on where the notches are and take it one step at a time. This will not be a quick sew but you end up with this amazing garment thats really something else, as in, high fashion design else. Style.
Photos in this post come from two different makes, one in medium weight marmalade linen from The Fabric store & one in cotton/linen twill from Spotlight. With linen, the curves are easier to mould and shape, no surprise

Mark it
up
I took the precaution of marking everything up really obviously when testing but as an aside, I now always put a scrap of tape on the wrong side whenever I sew anything, it eliminates the stress of trying to figure it out later on… because its never too late to make a rookie mistake, no matter how long you’ve been sewing, that mistake can always be made BUT NOT if you mark it up.
I do recommend it for this make though, the gussets could easily be confused for good side/wrong side & the front & back pieces form a kind of hook shape & swing around when sewing so it can get tricky.
Vilene shields would be a helpful addition if you can go there, particularly when making the dress. Block fusing also.
In any event, keep the pattern pieces handy to refer back to them in the name of accuracy to check everything is the shape its supposed to be, so it all matches up.

I hand tacked the shoulder seams before sewing so there’d be a nice clean curved line
At most seams I did a bit of hand basting and generally used lots of pins. Be prepared for liberal pin usage, they are both friend and helper


Foolproof facing matching at shoulder/neckline join

Re-marking the pattern pieces for front neckline facing accuracy, its a critical pivot point


Tale of two gussets
one went easy, one went hard
The gussets; check they’re the right against the pattern pieces, pull at the staystitching & steam-press it to get them back in check. Sew at 1cm seam allowance, nothing else will work. Linen was considerably more forgiving than cotton-linen twill because steam & press the fork out of it, but see my best result below, which is the cotton/linen twill

Stay stitching, hand basting, sewing

What a beautiful gusset insertion!

About that staystitching, it’s best in a contrast thread colour. This is stated at the beginning of the instructions regarding interfacing & stay tape & I’d say its essential. There’s a lot of action happening in the underarm & sleeve areas with the gussets & several lines of stitching, so to avoid confusion, the stay stitching is in a colour contrast colour to differentiate it. It also makes it easy to find & unpick at the end
If the under arm/sleeve does grow anyway, as mine did as seen above, it is salvageable (particularly with linen). Take a long basting stitch down the whole length, pull it taut like you’re gathering it until the sides match in length, then distribute the fullness evenly across without making actual gathers, steam and press, sew together & press again, it’ll be fine. Just the same as easing in a sleeve head but easier because its flat.

Three rows
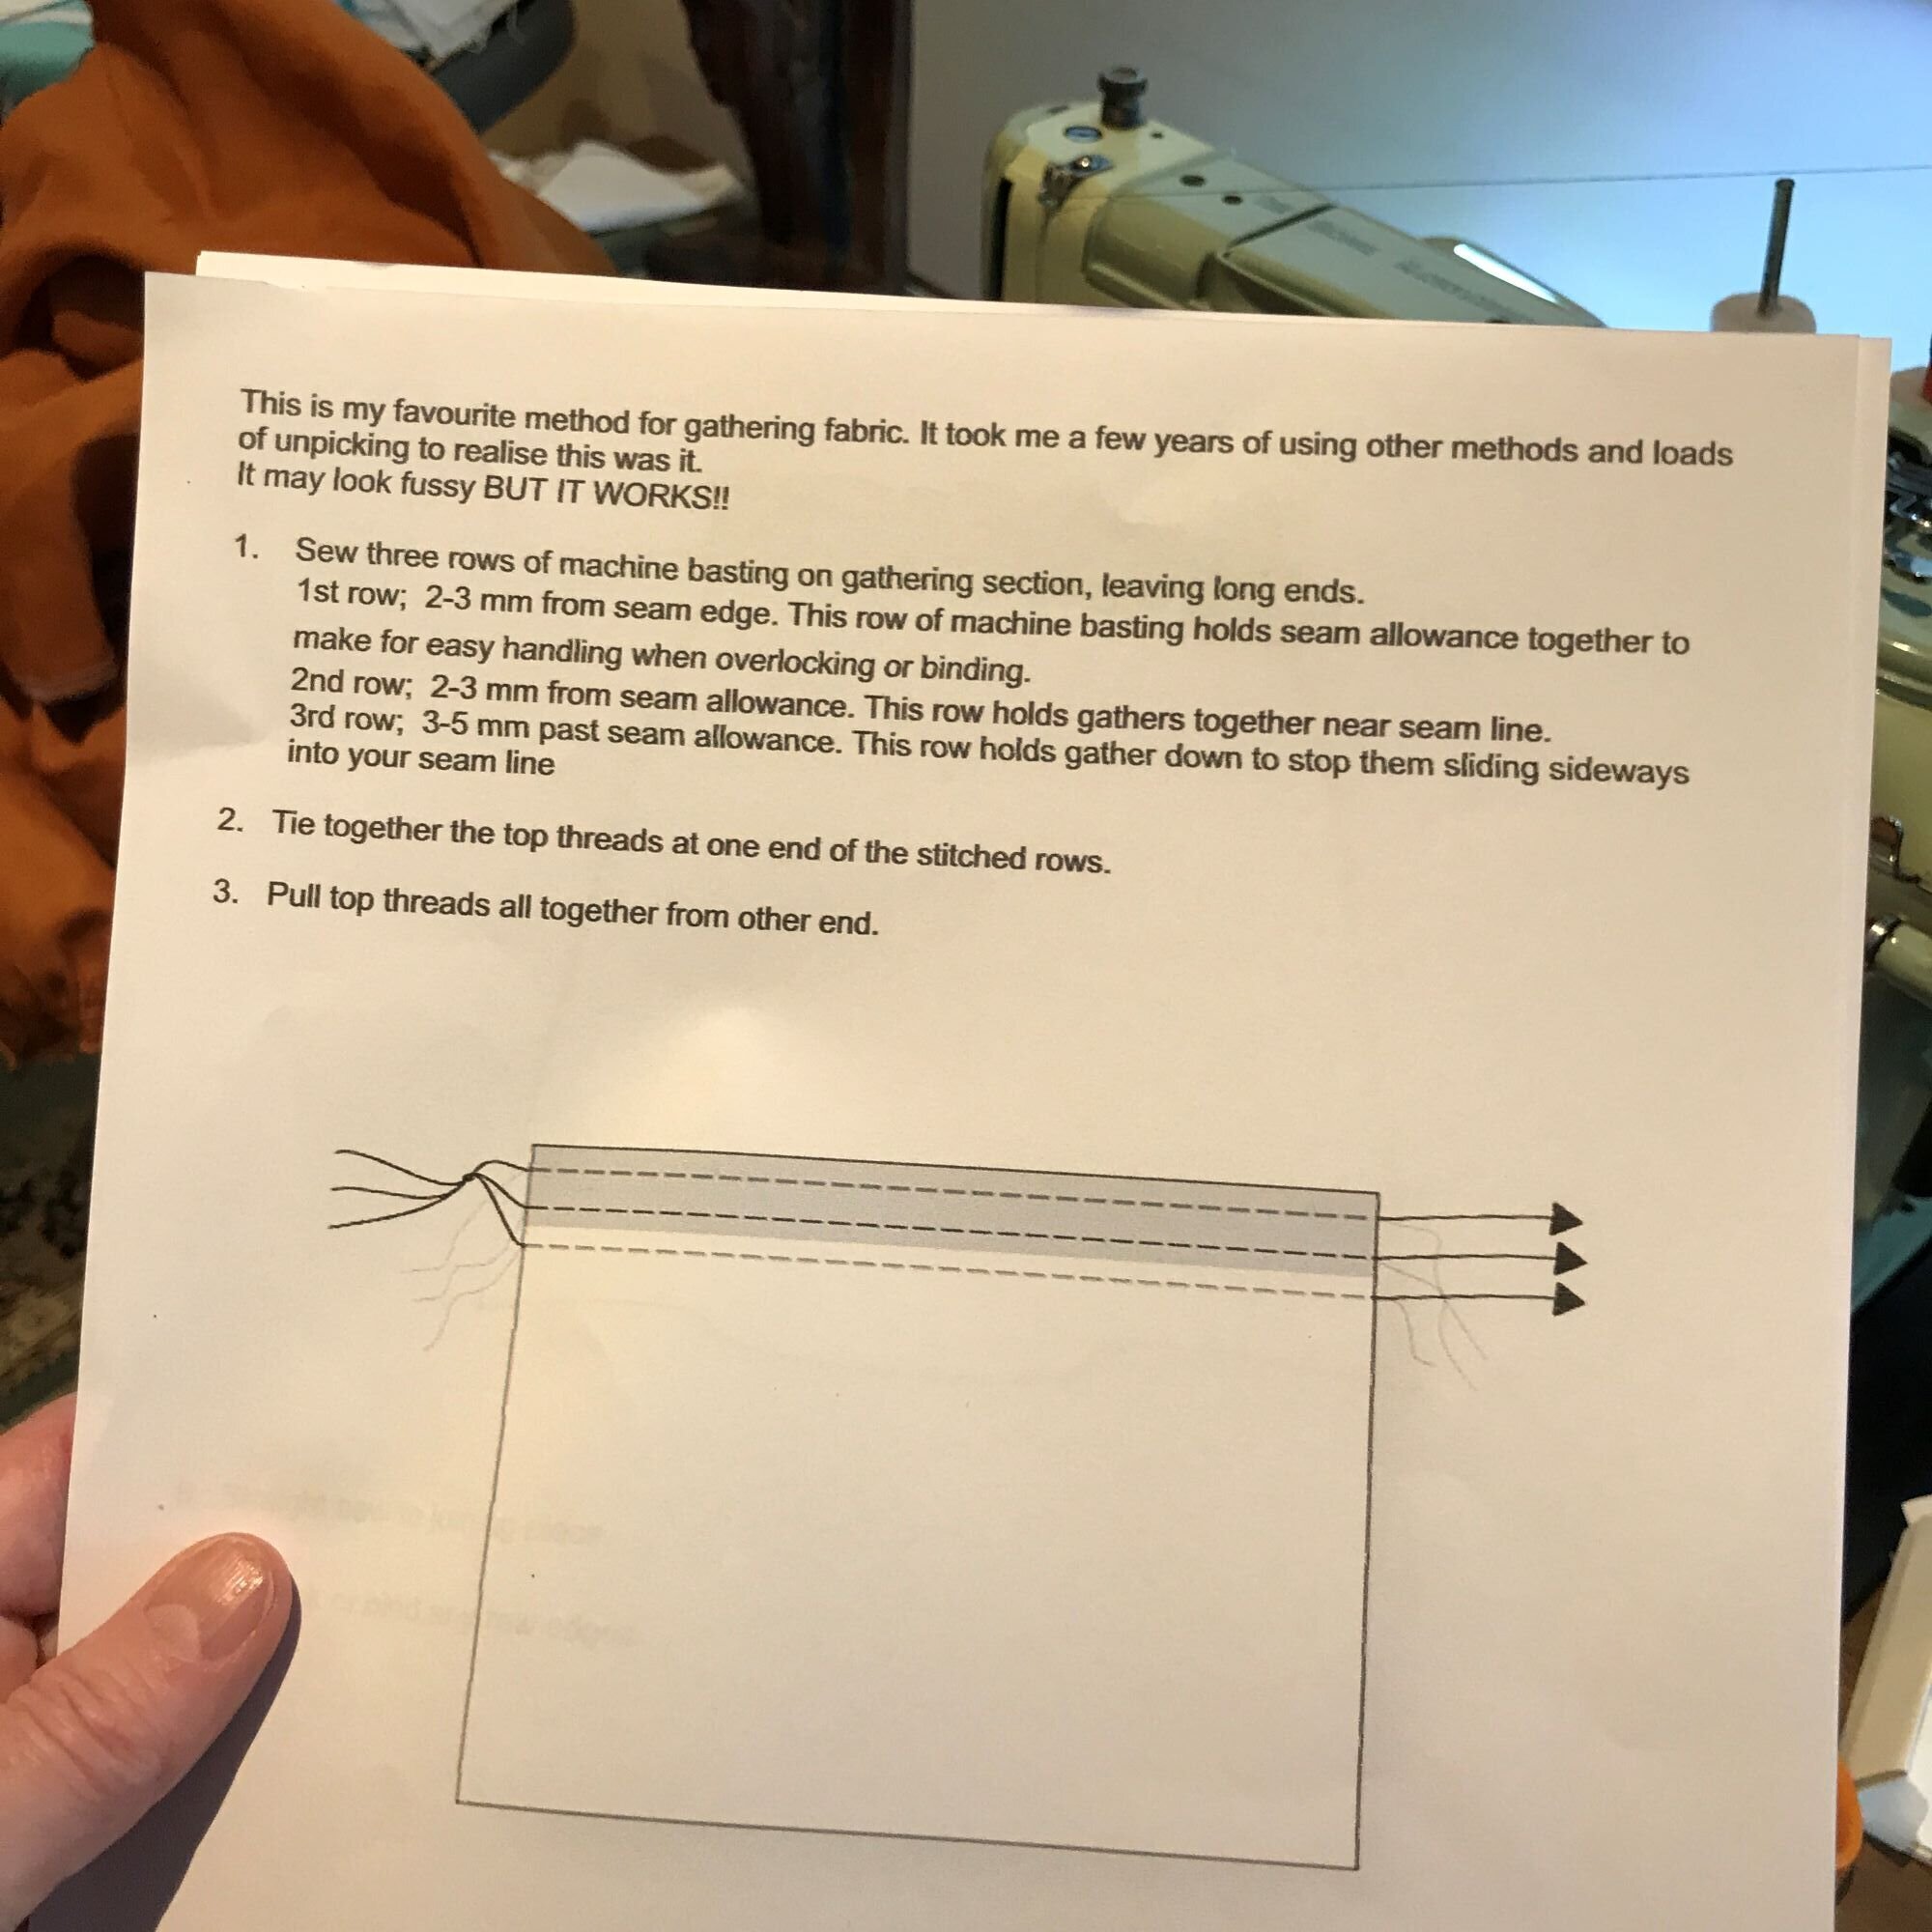
do this
For the actual gathers, this is how to do it, it works fantastiquly well and with the sleeves being a major feature at the cuff end too, it is worth it. Its just one more line of stitching & the layering of the rows is pretty cunning, specially the one that goes outside of the gathering area. Phenomenal improvement of outcome.

Lace edged overlocker stitch . I’m going with lace edge. Not way out of whack, which is what it is, but I let it go, such was my enthusiasm


To finish the sleeve, the PF preferred way is to completely bind it before sewing the side seams closed but as ever, with sewing, there are various ways of going about it & this is how I did mine. It’s two steps, before then after the sides are sewn together.

I pressed a single fold on the self bias binding - folded down about 3-4mm - and lined up the un-pressed edge right sides together with the raw edge of the cuff, which is facing up. Sew at about 4mm parallel to edge, then trim the new raw edge so its all neat & even then press out toward the hand.

Unfold the binding & sew underarm seam closed, sew from hem around the underarm up the sleeve & right across the (unfolded and pressed outwards) binding to the raw edge


Give everything a press, fold the binding back over towards the inside so the pressed edge covers the raw gathered cuff completely.

Stitch in the ditch. Pin it from the right side through to the inside. The pins should catch the edge of the binding on the inside, so you’ll know that when you are stitching from the right side, you will catch it underneath

Sew it down; stitch in the ditch or hand sew. I stitched that ditch & look how it came up!


oh my!

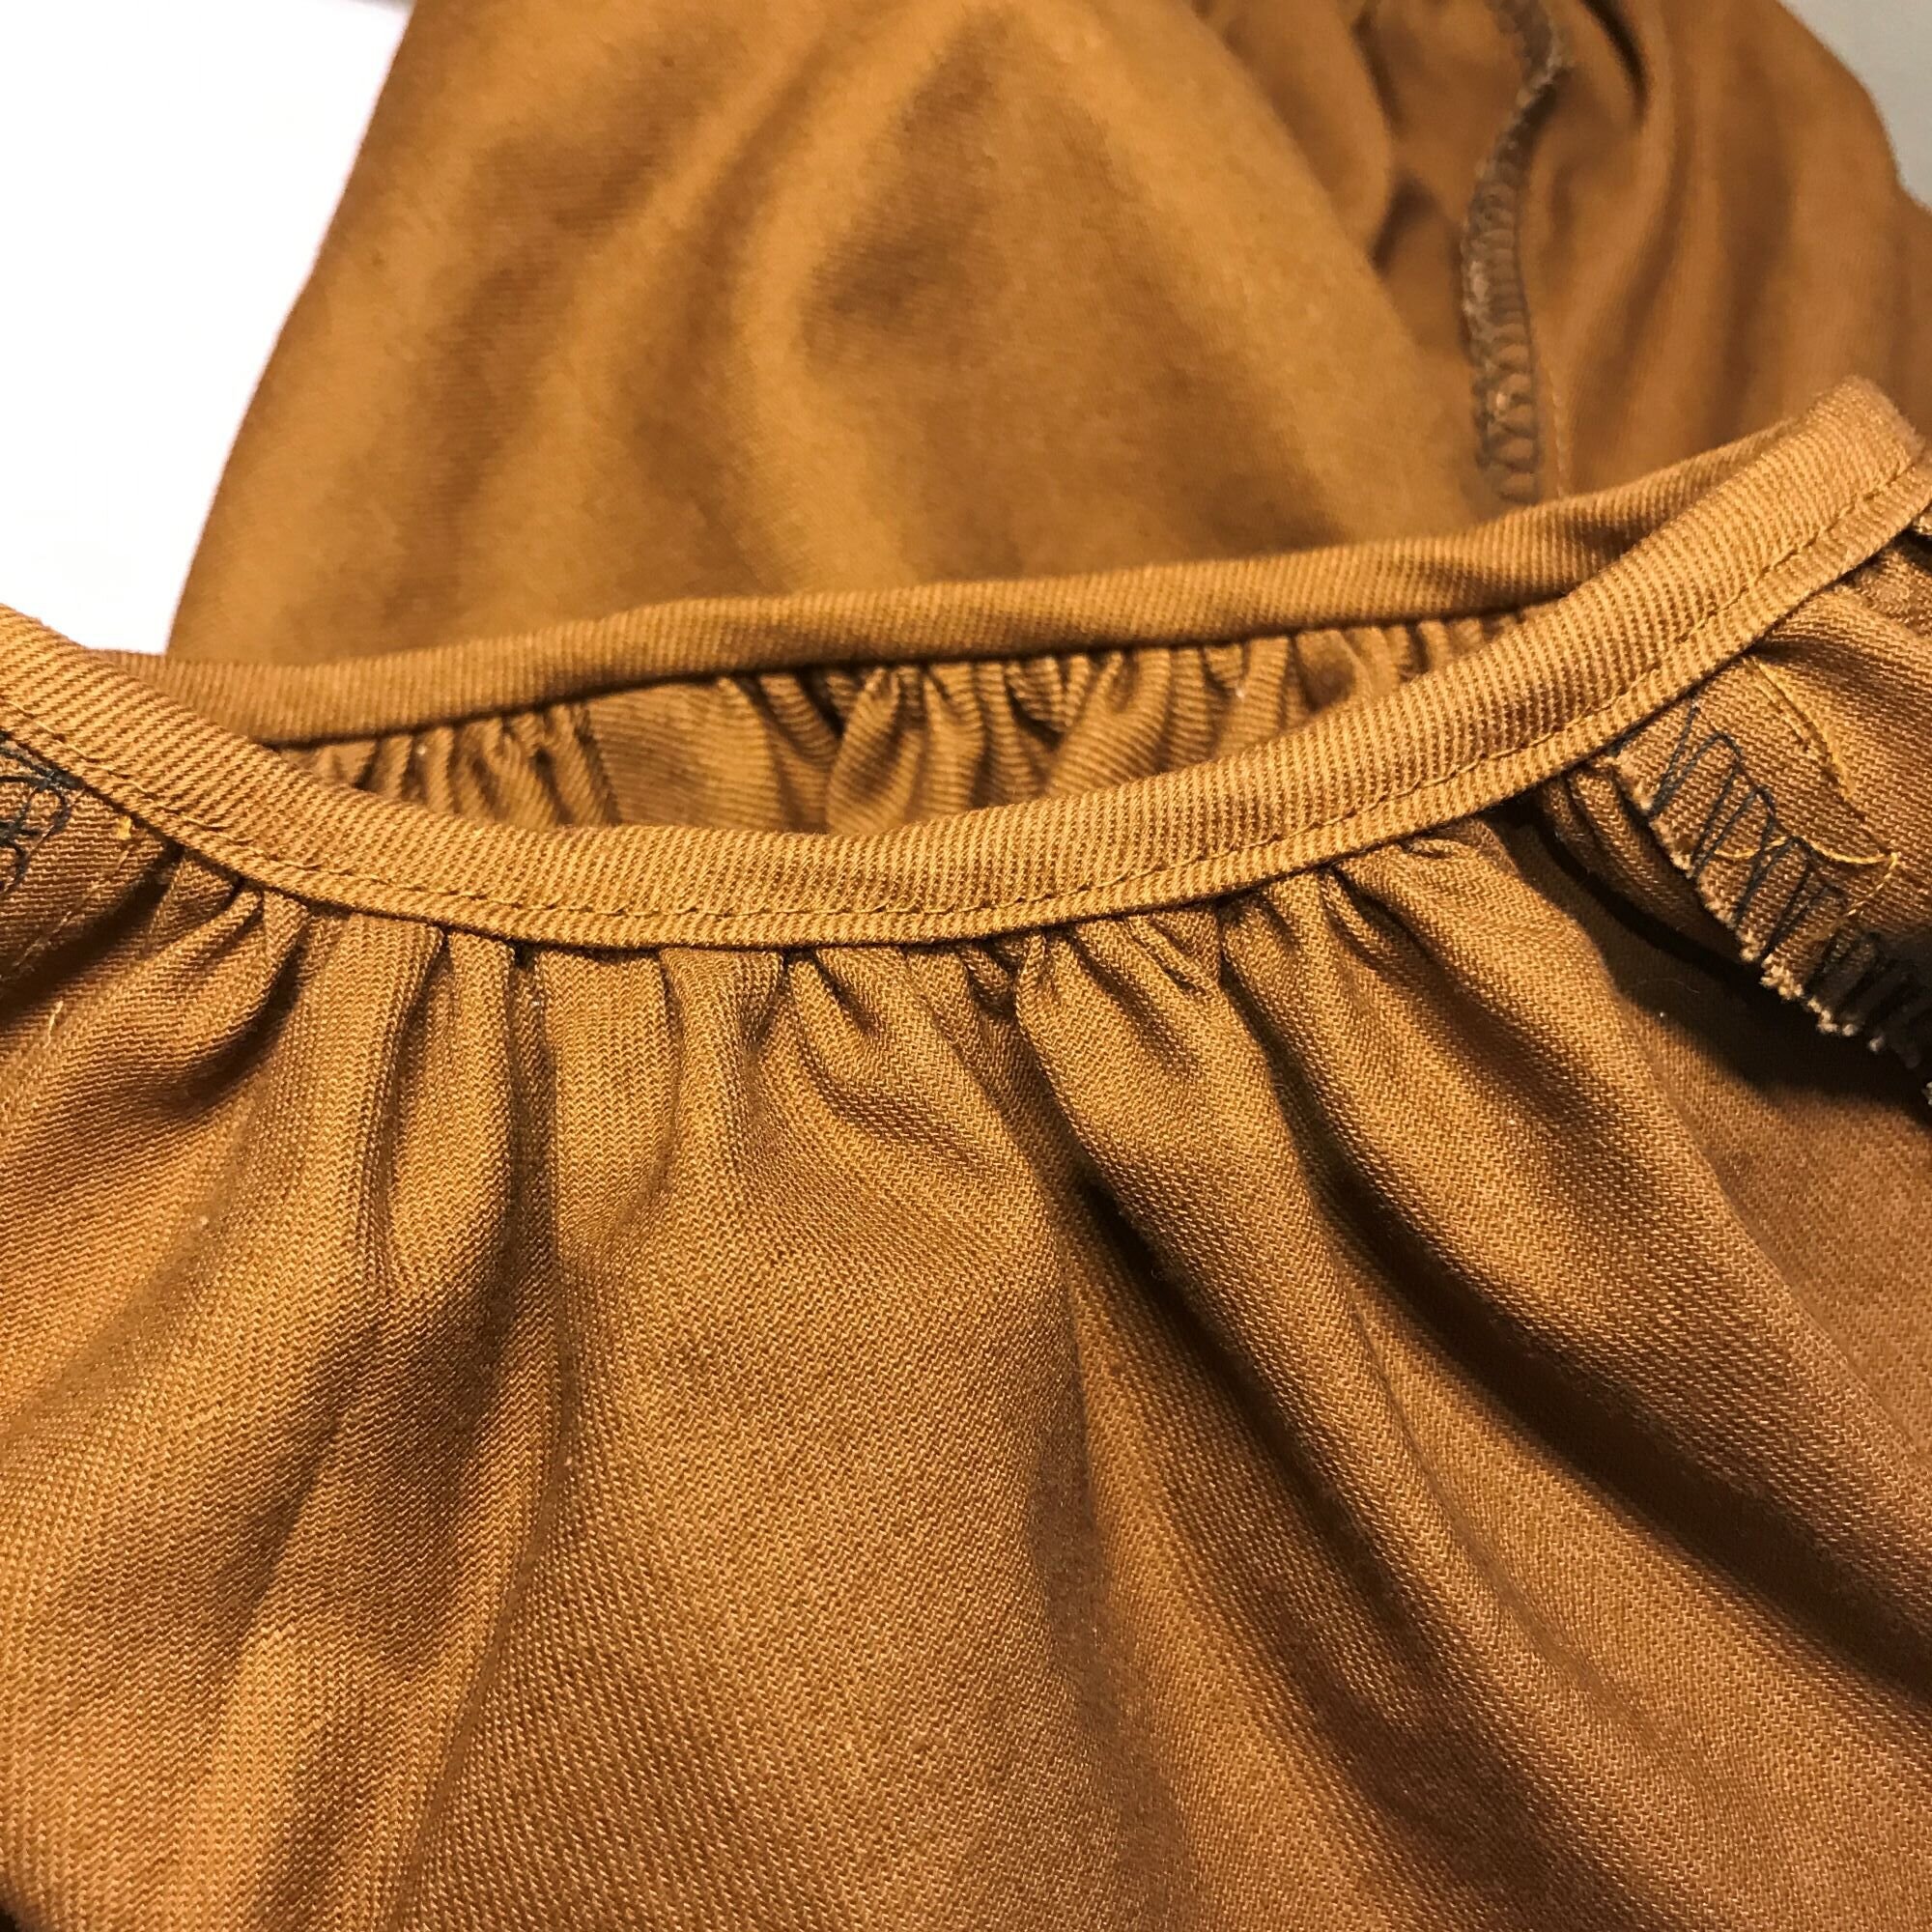
Little bit of twist on this binding, a hazard that comes with the dense twill fabric


Now, the marmalade linen version is size 14 and while thats fine, I went on to make the size 12 cotton/linen twill, which is truer to my measurements. I was worried at first that it might be too firm around the tummy because my body has shifted around with menopause so I sized up, but I was advised there’s 5cm between grades so just pin out at the side of the pattern at the waist for ease, which would give me a better fit under the arm & bust. There’s 4.5” of side seam from where the sleeve ends to the hem (if making a top) & grading it worked out well. I like good ease. That split hem (see below), while truly being some lunatic cutting error, would actually add more ease but I wouldn’t advocate for it, purely because I wouldn’t mess with the integrity of the design. I married an architect so I know how this hurts designy people. I can also override that concession at whim, but not with this.

Yeah ok so it fits better. The ‘feature’ split hem is a result of….I dont know, I cut it badly? Weird


This design easily works both sizes. I’ll need some bra-keepers on the larger one because sloping shoulders. The more fitted size 12 feels very…important?. The firmer cotton/linen twill holds the sleeve shape pouffier and it feels dressier. The shape is really interesting, its loose but falls in an hourglass way, it creates amazing curvatures & manages to be both breezy and fitted at the same time, depending on the angle or how you hold yourself. Fascinatingly sexy/demure. I had thoughts about raising the back neckline or inserting a panel but again, the design is complete, just as it is, its its own thing. PF will be releasing more patterns with similar feels & different coverages & I cant wait to see them

Magnifico

Cloth sculpture

Gusset engineering

Gusset skeleton

Abstract artwork

my
sweet
machine
My new machine. Home/industrial Singer 319K circa 1950’s. I’ve upgraded plastic to heavy metal and retrograded tech 70 or so years. What a beauty.

….. sleeves

Need bra keepers on shoulders because sloping

On my tippytoes

On my way out, thanks for visiting!
And then its hem & you’re done, if making the top. I’m making the ankle length dress next…although it is tempting to order one ready made from Saigon…..pre-order is available. I’m really tempted & just might fall. This isn’t a difficult design to make but its an undertaking that requires attention & precision. Not, perhaps, my forte. But then I made two! Getting those gussets & gathered cuffs so fantastique was a wonderful experience of accomplishment that comes along when you’ve taken on something tricky & new & won. Very cool. Have a go. Try it. Its unique, its really unique and clever and high-end. It’s a rewarding making experience and its something really good to wear, to have. I’m a shameless Pattern Fantastique fan girl, as I’m sure you can tell. Thank you Nita-Jane for the opportunity to test sew this!

Byeeeee